# What is DitLead?

DitLead is an all-in-one solution for automating and managing email and LinkedIn outreach! Designed to help you connect with prospects efficiently and scale your outreach efforts.

### What can you do with DitLead?

<figure><img src="https://1158745445-files.gitbook.io/~/files/v0/b/gitbook-x-prod.appspot.com/o/spaces%2FII7k0ydU1L24zSe4KxuO%2Fuploads%2FBFlwRMGzH1fhwkOy9vsB%2Fcampaign%20analytics.png?alt=media&amp;token=dd9f2222-e31a-4047-8d9e-a34f7a507988" alt=""><figcaption></figcaption></figure>

DitLead is a powerful outreach automation platform that streamlines your lead generation process. It’s not just about sending messages—it’s about building meaningful connections through:

* **Email & LinkedIn Outreach**: Automate personalized outreach at scale across both platforms.
* **Lead Generation & Search**: Discover new prospects and identify high-quality leads effortlessly.
* **Email Validation:** Improve deliverability by validating emails, only send to leads with valid emails.
* **Email Warmup**: Warm up your inbox using our network of over 55,000 mailboxes to improve trust with email providers and get landed in inbox.
* **Advanced CRM**: Manage leads, track tasks, and organize your pipeline with a user-friendly CRM system.

<table data-view="cards"><thead><tr><th></th><th></th><th></th><th data-hidden data-card-target data-type="content-ref"></th></tr></thead><tbody><tr><td><p><span data-gb-custom-inline data-tag="emoji" data-code="1f345">🍅</span></p><p><strong>Outreach</strong></p></td><td>LinkedIn &#x26; Email outreach at scale across both platforms.</td><td></td><td><a href="/email-and-linkedin-outreach/how-to-launch-a-cold-email-and-linkedin-outreach-campaign-using-ditlead">Email &amp; LinkedIn Outreach</a></td></tr><tr><td><span data-gb-custom-inline data-tag="emoji" data-code="1f336">🌶️</span></td><td><strong>Email warmup</strong></td><td>Warmup your mailboxes to improve deliverability and avoid the spam folder.</td><td><a href="/setups-and-configurations/how-to-connect-email-accounts-to-ditlead">Setups &amp; Configurations</a></td></tr><tr><td><span data-gb-custom-inline data-tag="emoji" data-code="1f935">🤵</span></td><td><strong>CRM &#x26; Pipeline</strong></td><td>AI-powered lead management, and pipeline tracking.</td><td><a href="/crm-and-pipeline/how-to-import-leads-to-ditlead">CRM &amp; Pipeline</a></td></tr></tbody></table>

### Who is DitLead for?

DitLead is built for sales teams, marketers, and business owners looking to enhance their outreach efforts. Whether you're a startup seeking to build initial traction or an established company scaling your sales process, DitLead can help you stay organized and achieve better results.

#### Key Features

* **Outreach Automation**: Create customized, multi-step campaigns across email and LinkedIn.
* **Lead Management**: Track interactions and manage contacts with intuitive pipelines.
* **Task Management**: Stay on top of follow-ups with task scheduling and reminders.
* **Analytics & Insights**: Monitor campaign performance and optimize outreach strategies with actionable insights.

#### Get Started

Ready to automate and enhance your outreach? Head over to the **Getting Started** section for a quick setup guide or explore detailed documentation to unlock the full potential of DitLead.

Let’s revolutionize your outreach process! 🚀


# Getting Started with DitLead

Getting Started with DitLead This guide will walk you through the initial setup so you can start automating your email and LinkedIn outreach quickly. Follow these simple steps to get up and running:

#### 1. **Create an Account**

Start by signing up for a DitLead account. Our **Free Tier** allows you to upload and manage up to **500 leads**, making it perfect for testing out the platform and running small campaigns.

* Visit the [DitLead Signup Page](https://app.ditlead.com/register) and register with your email.
* Once registered, verify your email to activate the account.

***

#### 2. **Add a Mailbox**

To send emails, you'll need to connect your mailbox. DitLead supports multiple email accounts, giving you flexibility in managing outreach campaigns.

* Navigate to the **Email accounts** section.
* Click **Add Mailbox** and follow the instructions to connect your email account.
* **Optional**: Enable our **Email Warmup** service to improve your inbox’s deliverability and reputation.

For LinkedIn outreach, you can also:

* Go to **LinkedIn Accounts** section and link your LinkedIn account.

***

#### 3. **Create a Campaign**

With your email or LinkedIn accounts set up, it’s time to create your first campaign.

* Go to the **Campaigns** tab and click **Create Campaign**.
* Select one of our **pre-designed templates** to get started quickly or create a custom workflow based on your goals.

<figure><img src="https://1158745445-files.gitbook.io/~/files/v0/b/gitbook-x-prod.appspot.com/o/spaces%2FII7k0ydU1L24zSe4KxuO%2Fuploads%2FADPhS8Zg3K28yHUPYtM3%2Fcreate%20campaign.png?alt=media&amp;token=100aa7f9-5ee7-41ee-aa02-40ad1fc73b98" alt=""><figcaption></figcaption></figure>

Select from pre-made templates or start from scratch:

<figure><img src="https://1158745445-files.gitbook.io/~/files/v0/b/gitbook-x-prod.appspot.com/o/spaces%2FII7k0ydU1L24zSe4KxuO%2Fuploads%2FVtlFycuDBRi2673G48l1%2Fselect%20campaign%20template.png?alt=media&amp;token=bc57fc27-b8f1-4320-8912-97bb242b15d4" alt=""><figcaption></figcaption></figure>

***

#### 4. **Upload Your Leads**

Once your campaign is ready, you’ll need to upload your leads.

* In the **Leads** tab, click **Upload Leads** and import your file (CSV or Excel formats).
* Map the data fields to ensure accurate information.
* Review your leads and validate emails using DitLead’s **Email Validation** feature to ensure high deliverability.

***

#### 5. **Launch Your Campaign**

With everything set up, it’s time to launch your outreach!

* Review your campaign settings, preview the emails or LinkedIn messages, and hit **Launch**.
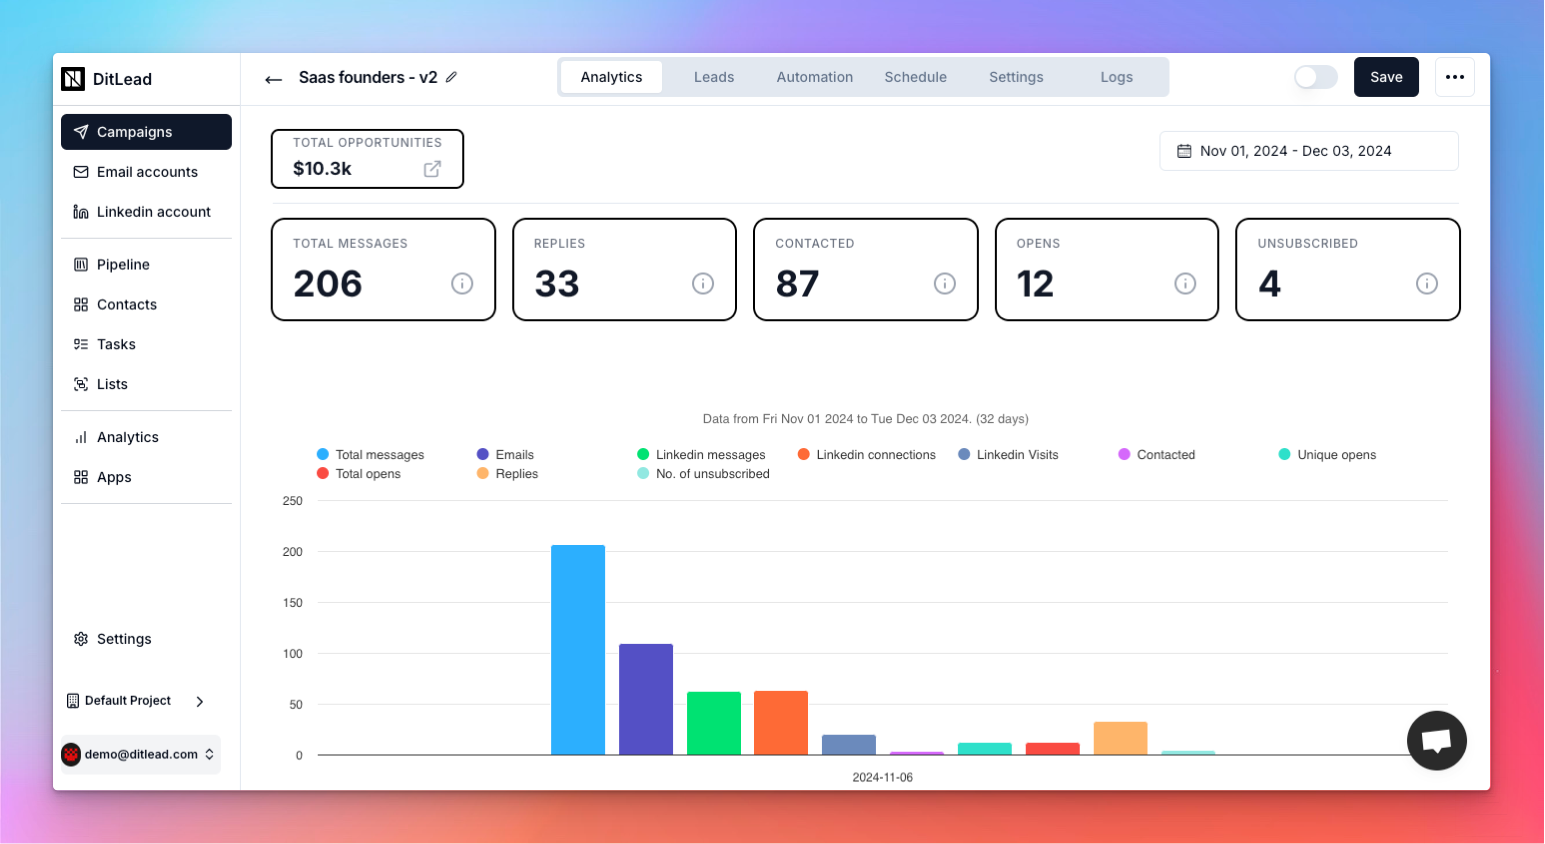
* Monitor progress and performance in the **Dashboard**, where you’ll see metrics like open rates, clicks, and replies.

<figure><img src="https://1158745445-files.gitbook.io/~/files/v0/b/gitbook-x-prod.appspot.com/o/spaces%2FII7k0ydU1L24zSe4KxuO%2Fuploads%2FBFlwRMGzH1fhwkOy9vsB%2Fcampaign%20analytics.png?alt=media&amp;token=dd9f2222-e31a-4047-8d9e-a34f7a507988" alt=""><figcaption><p>Launch campaign and see campaign details</p></figcaption></figure>

***

#### What’s Next?

Explore advanced features like:

* **CRM and Task Management** for lead tracking and follow-ups.
* **A/B Testing** to optimize your messaging.
* **Analytics** to fine-tune your strategy based on performance data.
* **Deal AI**: track leads interest using AI.

You’re now ready to start automating and scaling your outreach with DitLead. Happy prospecting! 🚀


# How to Launch a Cold Email & LinkedIn Outreach Campaign Using DitLead

How to launch cold email outreach campaign using DitLead.

<figure><img src="https://1158745445-files.gitbook.io/~/files/v0/b/gitbook-x-prod.appspot.com/o/spaces%2FII7k0ydU1L24zSe4KxuO%2Fuploads%2FBFlwRMGzH1fhwkOy9vsB%2Fcampaign%20analytics.png?alt=media&amp;token=dd9f2222-e31a-4047-8d9e-a34f7a507988" alt=""><figcaption></figcaption></figure>

Launching a successful cold email and LinkedIn outreach campaign with **DitLead** is straightforward and efficient. This guide will walk you through each step, ensuring you leverage all the platform’s powerful features to maximize engagement and conversions.

***

#### 1. **Create a Campaign**

Start by navigating to the **Campaigns** tab and clicking **Create Campaign**. You’ll have the option to:

* **Use Pre-made Templates**: Save time by selecting from DitLead’s ready-made templates.
* **Customize from Scratch**: Build your own workflow to tailor outreach to your specific needs.

<figure><img src="https://1158745445-files.gitbook.io/~/files/v0/b/gitbook-x-prod.appspot.com/o/spaces%2FII7k0ydU1L24zSe4KxuO%2Fuploads%2FADPhS8Zg3K28yHUPYtM3%2Fcreate%20campaign.png?alt=media&amp;token=100aa7f9-5ee7-41ee-aa02-40ad1fc73b98" alt=""><figcaption></figcaption></figure>

You can select already made templates:

<figure><img src="https://1158745445-files.gitbook.io/~/files/v0/b/gitbook-x-prod.appspot.com/o/spaces%2FII7k0ydU1L24zSe4KxuO%2Fuploads%2FVtlFycuDBRi2673G48l1%2Fselect%20campaign%20template.png?alt=media&amp;token=bc57fc27-b8f1-4320-8912-97bb242b15d4" alt=""><figcaption><p>Select from existing template or start from scratch</p></figcaption></figure>

***

#### 2. **Campaign Sections Overview**

Once your campaign is created, you’ll find six key sections that help you manage and optimize your outreach:

***

#### **1. Analytics Section**

The **Analytics** section provides a comprehensive overview of your campaign’s performance, including:

* **Summary Section**: Key metrics such as the number of leads contacted, LinkedIn messages sent, and more.
* **Chart Section**: Detailed visualizations of performance metrics presented in beautiful, interactive charts.
* **Opportunities by Deal AI**: See the total dollar value of deals discovered through the campaign, helping you track ROI.

***

#### **2. Leads Section**

Manage your leads in the **Leads** section, where you can:

* **Import New Leads**:
  * **Upload**: Import files in CSV, XLSX, or XLS formats.
  * **Email Input**: Paste a list of email addresses directly.
  * **Manual Entry**: Use DitLead’s lead form to add leads individually.
* **Organize and Filter**: Sort leads and apply filters for better management.

***

#### **3. Automation Section**

This is the heart of your campaign, where you design workflows and create outreach content. DitLead offers **9 workflow steps** to build a flexible and dynamic campaign:

<figure><img src="https://1158745445-files.gitbook.io/~/files/v0/b/gitbook-x-prod.appspot.com/o/spaces%2FII7k0ydU1L24zSe4KxuO%2Fuploads%2FgSPoCyuYdRFKfq4uTmeC%2Femail%20step.png?alt=media&amp;token=cac8019b-c165-4f98-ad21-4b73b314a572" alt=""><figcaption></figcaption></figure>

* **Email Step**:
  * Create and optimize email content with A/B variants.
  * Use DitLead’s **AI-powered copywriting** to generate compelling email copy.
  * Save and reuse email templates.
* **Delay Step**: Set delays between actions, e.g., wait 2 days before sending a follow-up.
* **Call Step**: Assign calls to team members, with tasks automatically created in the CRM.
* **Route Step**: Add conditional logic with “Yes” or “No” paths. Conditions include:
  * Has the contact opened an email?
  * Has the contact replied or unsubscribed?
  * Does the contact have a LinkedIn URL or phone number?
  * Custom conditions can be created using the intuitive query builder.
* **Action Step**: Automate actions such as assigning leads to a sales rep or adding labels.
* **LinkedIn Invitation Step**: Send personalized LinkedIn connection requests with message variants.
* **LinkedIn Chat Message Step**: Send personalized LinkedIn messages with A/B testing and AI assistance.
* **LinkedIn Profile Visit Step**: Record profile visits to draw attention to your leads.
* **Task Step**: Create tasks automatically in the CRM for follow-ups or other actions.

<figure><img src="https://1158745445-files.gitbook.io/~/files/v0/b/gitbook-x-prod.appspot.com/o/spaces%2FII7k0ydU1L24zSe4KxuO%2Fuploads%2FcD3o6y8t7snCS3r3EgRB%2Femail%20template%20selectin.png?alt=media&amp;token=cae67c54-6171-4e41-9c73-7947f26a9917" alt=""><figcaption><p>Select from list of pre-made email templates</p></figcaption></figure>

***

#### **4. Schedule Section**

The **Schedule** section allows you to fine-tune when and how your campaign runs:

* **Start & End Dates**: Define the campaign’s duration.
* **Days & Time Ranges**: Choose specific days and times for the campaign to operate.
* **Timezone**: Set the appropriate timezone to align with your target audience.

***

#### **5. Settings Section**

In the **Settings** section, configure critical campaign parameters:

* **Account Selection**: Choose which email and LinkedIn accounts to use.
* **Deal AI Behavior**: Customize how Deal AI tracks and reports opportunities.
* **Campaign Options**:
  * Enable or disable open rate tracking.
  * Stop outreach when a lead replies.
  * Add unsubscribe links.
  * Restrict outreach to uncontacted leads.

***

#### **6. Logs Section**

Monitor your campaign in real time with the **Logs** section. This live feed provides:

* Detailed insights into each action taken.
* Status updates for emails sent, LinkedIn messages delivered, and tasks created.
* Quick troubleshooting for any issues that may arise.

***

#### Final Steps: Launch and Monitor

Once your campaign is configured, click **Launch**! You can track performance and optimize in real-time using the **Analytics** and **Logs** sections.

With DitLead’s comprehensive tools and automation features, you’re ready to engage leads effectively and grow your pipeline. Happy outreach! 🚀


# Personalization on DitLead

Personalization is a key factor in successful outreach campaigns. With DitLead, you can tailor your emails and LinkedIn messages to each lead using **merge tags** and the **Liquid templating language**. This level of customization helps you build stronger connections, boost engagement, and improve response rates.

***

### Why Personalization Matters

* **Higher Engagement**: Personalized emails feel more relevant and increase open and reply rates.
* **Stronger Connections**: Tailoring your message to each lead's specific details fosters trust and rapport.
* **Improved Conversions**: Customized messages resonate more with prospects, leading to better conversion outcomes.

***

### Personalization Options in DitLead

#### 1. **Merge Tags**

Merge tags allow you to dynamically insert lead-specific information into your emails and messages. DitLead supports a variety of merge tags, including:

* **{{ first\_name }}**: Inserts the lead’s first name.
* **{{ last\_name }}**: Inserts the lead’s last name.
* **{{ company\_name }}**: Inserts the lead’s company name.
* **{{ job\_title }}**: Inserts the lead’s job title.
* **{{ email }}**: Inserts the lead’s email address.
* [**Custom Fields**:](/crm-and-pipeline/custom-fields-and-label) Use any custom fields you’ve created for further personalization.

**Example:**

```plaintext
Hi {{ first_name }},  
I noticed you’re the {{ job_title }} at {{ company_name }}. I’d love to discuss how we can help your team streamline operations.  
```

***

#### 2. **Liquid Templating Language**

DitLead also supports the powerful **Liquid** templating language, allowing for advanced personalization logic in your messages. With Liquid, you can:

* **Use Conditional Logic**: Customize content based on lead data.
* **Loop Through Data**: Insert multiple values dynamically.
* **Format Data**: Adjust the format of dates, numbers, and text.

**Example:**

```liquid
{% if job_title == "CEO" %}  
Hi {{ first_name }}, I admire the leadership role you have at {{ company_name }}.  
{% else %}  
Hi {{ first_name }}, I’d love to connect with you regarding opportunities at {{ company_name }}.  
{% endif %}  
```

***

### How to Use Personalization in Campaigns

#### Step 1: Select Your Template

1. Go to the **Automation** section of your campaign.
2. Choose an **Email Step** or **LinkedIn Step**.
3. Select a template or create a new message.

#### Step 2: Insert Merge Tags

1. Place your cursor where you want to insert personalized content.
2. Click on the **Merge Tag** dropdown and select the desired tag.

#### Step 3: Add Liquid Logic (Optional)

1. For advanced personalization, insert Liquid code directly into the message.
2. Use **preview mode** to test how the message will look with real lead data.

***

### Best Practices for Personalization

* **Gather Rich Data**: Use DitLead’s lead management tools to collect detailed information about each lead.
* **Test Messages**: Preview your messages to ensure tags and Liquid logic render correctly.
* **Avoid Over-Personalization**: Balance personalization with relevance to avoid sounding robotic or forced.
* **Combine with A/B Testing**: Test different personalized messages to see what resonates best with your audience.

***

### Example Personalized Email

```plaintext
Subject: Let’s discuss your growth strategy, {{ first_name }}  

Hi {{ first_name }},  

As the {{ job_title }} at {{ company_name }}, I’m sure you’re focused on driving growth and efficiency. We specialize in helping teams like yours achieve these goals with ease.  

Would you be open to a quick chat next week?  

Looking forward to connecting!  

Best regards,  
[Your Name]  
```

By leveraging **merge tags** and **Liquid logic**, DitLead empowers you to create highly personalized and effective outreach campaigns. Personalization not only makes your emails stand out but also helps build meaningful relationships with your leads. 🎯


# Spintax in DitLead

Use spintax to send unique content to each lead to avoid your emails getting flagged as a mass email.

**Spintax** is a method of creating dynamic content by using multiple variations of words, phrases, or entire sentences. DitLead supports spintax formatting to help you craft unique emails and messages, ensuring each recipient receives a slightly different version. This technique improves deliverability, reduces spam triggers, and enhances engagement by making your outreach appear more natural.

***

### What is Spintax?

Spintax uses curly brackets `{}` and the pipe `|` symbol to define variations. Each option within the brackets is separated by the pipe. When sending emails or messages, DitLead randomly selects one of the variations.

#### Spintax Format:

```plaintext
{option1|option2|option3}
```

#### Example:

```plaintext
Hi {John|Jane|Alex},  
I wanted to {reach out|connect|touch base} regarding {your company|the work you do at {{ company_name }}|your recent projects}.
```

***

### Benefits of Using Spintax in DitLead

* **Improved Deliverability**: Reduces the likelihood of emails being flagged as spam by varying content.
* **Unique Messages**: Creates diverse messages for each recipient, making your outreach feel personalized.
* **Time Efficiency**: Generate multiple versions of a message without manually rewriting.

***

### How to Use Spintax in DitLead

#### Step 1: Create a Message

1. Go to the **Automation** section of your campaign.
2. Choose an **Email Step** or **LinkedIn Step**.
3. In the message editor, insert your spintax wherever you want variations.

#### Step 2: Write Variations

1. Use curly braces `{}` and pipes `|` to define your variations.
2. Combine spintax with **merge tags** for advanced personalization.

**Example Email:**

```plaintext
Subject: {Exciting Opportunity|Quick Question|Let’s Connect}, {{ first_name }}  

Hi {{ first_name }},  

I noticed you’re {leading|managing|heading up} the team at {{ company_name }}. We specialize in helping {companies like yours|teams such as yours|businesses like {{ company_name }}} achieve {growth|efficiency|better results}.  

Would you be open to {a brief call|a quick chat|exploring this further}?  

Looking forward to your thoughts!  

Best regards,  
[Your Name]  
```

#### Step 3: Preview and Test

1. Use **preview mode** to see how the spintax resolves for different leads.
2. Send test emails to ensure variations render correctly.

***

### Best Practices for Spintax

* **Keep Variations Natural**: Make sure each option reads smoothly.
* **Use with Personalization**: Combine spintax with merge tags and Liquid for maximum impact.
* **Limit Complexity**: Avoid overly complex spintax that may confuse recipients.
* **Test Thoroughly**: Always preview and test your messages to ensure accuracy.

***

By incorporating **spintax** in your DitLead campaigns, you can craft dynamic, engaging content that stands out in crowded inboxes. This simple yet effective tool helps you scale outreach efforts while maintaining a personal touch. 🎯


# Add email accounts to DitLead


# Connect LinkedIn account to DitLead


# Deal AI & Campaign Pipeline


# How to connect email accounts to DitLead

Here are the guides on connecting mailboxes to DitLead for each mailbox type. Once connected, you can use the connected mailbox for email warmup and email outreach campaign.

<table data-view="cards"><thead><tr><th></th><th></th><th></th><th data-hidden data-card-target data-type="content-ref"></th></tr></thead><tbody><tr><td>Google</td><td>Connect Gmail, GSuite and Google workspace mailbox</td><td></td><td><a href="/setups-and-configurations/how-to-connect-email-accounts-to-ditlead/connect-gmail-gsuite">Connect Gmail/Gsuite</a></td></tr><tr><td>Microsoft</td><td>Connnect Microsoft365, Outlook and Hotmail mailboxes</td><td></td><td><a href="/setups-and-configurations/how-to-connect-email-accounts-to-ditlead/connect-microsoft365-outlook-hotmail">Connect Microsoft365/Outlook/Hotmail</a></td></tr><tr><td>Zoho</td><td>Connect Zoho mailbox using one-click OAuth</td><td></td><td><a href="/setups-and-configurations/how-to-connect-email-accounts-to-ditlead/connect-zoho">Connect Zoho</a></td></tr><tr><td>AWS SES</td><td>See how to connect AWS SES to DitLead</td><td></td><td><a href="/setups-and-configurations/how-to-connect-email-accounts-to-ditlead/connect-aws-ses">Connect AWS SES</a></td></tr><tr><td>SendGrid</td><td>See how to connect SendGrid to DitLead</td><td></td><td><a href="/setups-and-configurations/how-to-connect-email-accounts-to-ditlead/connect-sendgrid">Connect SendGrid</a></td></tr><tr><td>MailGun</td><td>See how to connect MailGun to DitLead</td><td></td><td><a href="/setups-and-configurations/how-to-connect-email-accounts-to-ditlead/connect-mailgun">Connect MailGun</a></td></tr><tr><td>Yahoo</td><td>See how to connect Yahoo mail to DitLead</td><td></td><td><a href="/setups-and-configurations/how-to-connect-email-accounts-to-ditlead/connect-yahoo-mail">Connect Yahoo Mail</a></td></tr></tbody></table>


# Connect Gmail/Gsuite

How to connect Gmail, Google workspace mailboxes to DitLead in simple steps.

Use this for full mailbox functionality. While this requires a few more steps to complete, it has better support for mail tracking & analytics. How to integrate:

* Go to [Email account](https://app.ditlead.com/v1/_/email-account) section on your DitLead dashboard
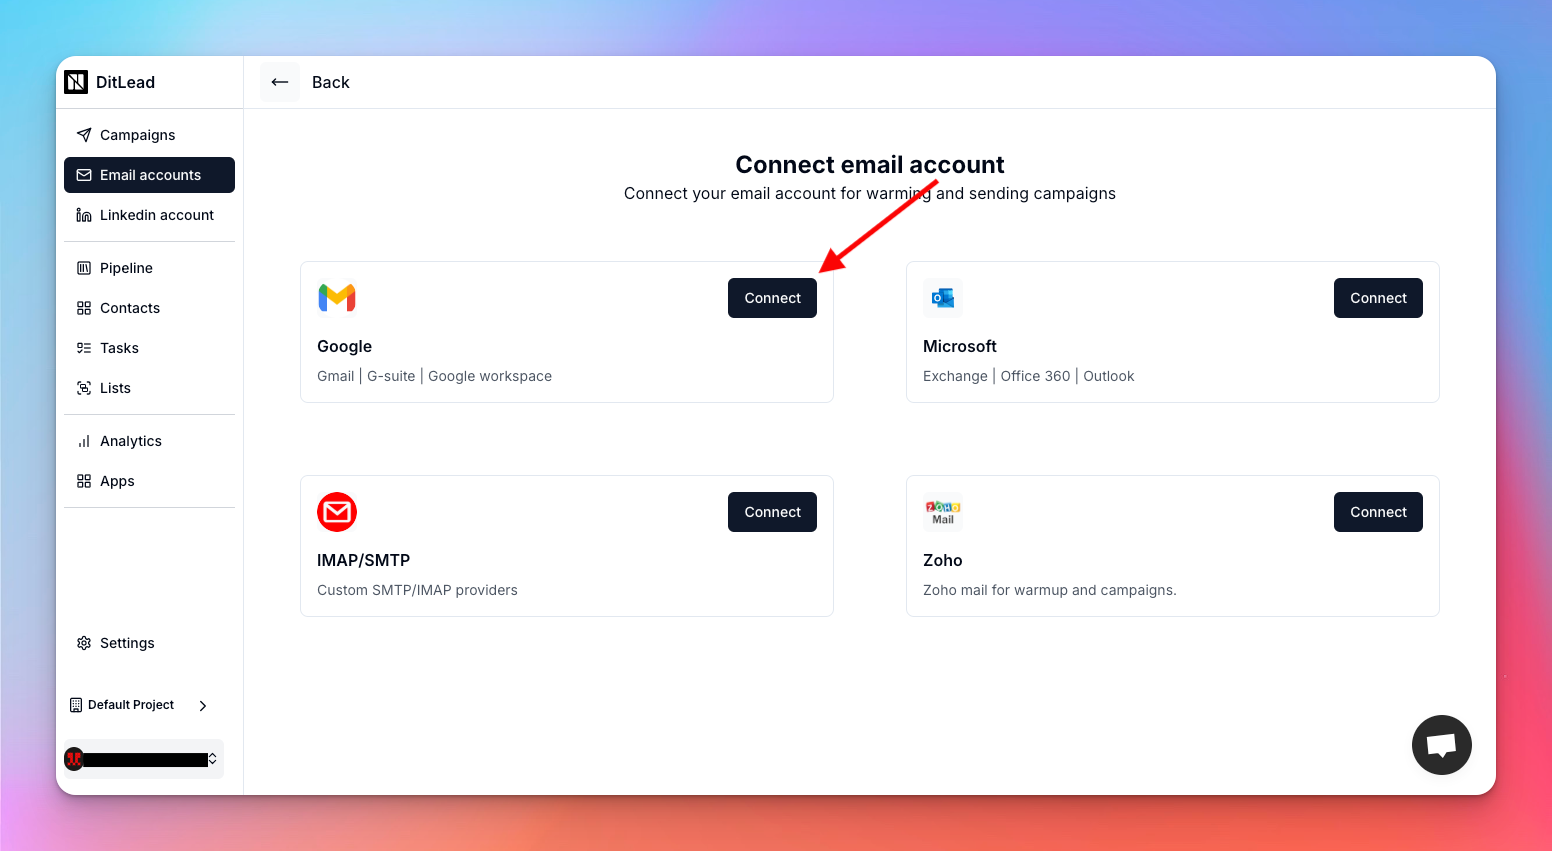
* Click on Add new, then on Connect Google as in the picture below:

<div align="center" data-full-width="false"><figure><img src="https://1158745445-files.gitbook.io/~/files/v0/b/gitbook-x-prod.appspot.com/o/spaces%2FII7k0ydU1L24zSe4KxuO%2Fuploads%2FxwKAVXuknZsgB2FfwqI7%2FSelect%20Google%20to%20connect%20Gmail%20and%20Gsuite.png?alt=media&amp;token=8a30a079-a760-4f46-9341-965fea15983e" alt=""><figcaption><p>Connect Google email like Gmail Gsuite and Google workspace emails to DitLead in simple steps.</p></figcaption></figure></div>

### Step 2: Enable IMAP

You will need to enable IMAP on your Google account. To enable IMAP:

1. Log in to the specific email account.
2. Click on settings on the top right corner
3. Then go to the Forwarding and POP/IMAP settings and Enable IMAP

### Step 3: Generate App Password

Instead of your Gmail login password, you will need to generate a safer app password on Google. To generate an app password:

1. Turn on [2-Step verification](https://myaccount.google.com/signinoptions/two-step-verification)
2. Generate [App Password](https://myaccount.google.com/apppasswords)
3. Select "Other" as app and device. Then copy App Password for use in next step.

#### Step 4: Finish setup

<figure><img src="https://1158745445-files.gitbook.io/~/files/v0/b/gitbook-x-prod.appspot.com/o/spaces%2FII7k0ydU1L24zSe4KxuO%2Fuploads%2FXAkrKxKjzT034X7B4KFZ%2Fadd%20gmail%20gsuite%20form.png?alt=media&amp;token=7b54fc98-732f-48d3-bf56-1caf97ab8760" alt=""><figcaption><p>Add Google mailbox details to connect them to DitLead</p></figcaption></figure>

Then click save, that's all!

You can warmup the connected email and use them in email outreach automation.


# Connect Microsoft365/Outlook/Hotmail

In this guide we will go over details on how to connect Microsoft365/Outlook/Hotmail to DitLead for email warming and cold email outreach automation using single click OAuth.

DitLead supports single click OAuth with all Microsoft mailbox. This means that all Microsoft mailboxes including free and paid can be connected by following the steps here.

To connect Microsoft account, follow the steps below:

* Go to [Email account](https://app.ditlead.com/v1/_/email-account) section on your DitLead dashboard
* Click on Add new, then on Connect Microsoft as in the picture below:

<figure><img src="https://1158745445-files.gitbook.io/~/files/v0/b/gitbook-x-prod.appspot.com/o/spaces%2FII7k0ydU1L24zSe4KxuO%2Fuploads%2FPrMzWz3p397pYIgV30YG%2FConnect%20Microsoft%20mailbox.png?alt=media&amp;token=2e9026fa-b785-472f-a0e6-9f53f09d7201" alt=""><figcaption><p>Connect Microsoft to DitLead for email warmup and automating cold email campaign outreach</p></figcaption></figure>

Select the mailbox to connect and click accept

<figure><img src="https://1158745445-files.gitbook.io/~/files/v0/b/gitbook-x-prod.appspot.com/o/spaces%2FII7k0ydU1L24zSe4KxuO%2Fuploads%2FLgyFlqWVZf1LCSz6FxQI%2FMicrosoft%20OAuth%20completion.png?alt=media&amp;token=869bd703-1063-4f96-813d-c23954f9e27b" alt=""><figcaption><p>Click on the accept to complete the Zoho OAuth integration with DitLead</p></figcaption></figure>

Then click Accept, that's all!

You can warmup the connected Microsoft mailbox and also use them in email outreach automation.&#x20;


# Connect Zoho

In this guide we will go over details on how to connect Zoho to DitLead for email warming and cold email outreach automation using single click OAuth.

DitLead supports single click OAuth with Zoho. This means that even Zoho's free mailboxes can be used for email warming and outreach campaigns.

To connect Zoho, follow the steps below:

* Go to [Email account](https://app.ditlead.com/v1/_/email-account) section on your DitLead dashboard
* Click on Add new, then on Connect Zoho as in the picture below:

<figure><img src="https://1158745445-files.gitbook.io/~/files/v0/b/gitbook-x-prod.appspot.com/o/spaces%2FII7k0ydU1L24zSe4KxuO%2Fuploads%2FMY50L8XSWpMrzrEXg09b%2FZoho%20select.png?alt=media&amp;token=300d22a1-dfc1-4883-a38a-b5d0aa451cb6" alt=""><figcaption><p>Connect Zoho to DitLead for email warmup and automating cold email campaign outreach</p></figcaption></figure>

Then select your Zoho region as in the picture below:

<figure><img src="https://1158745445-files.gitbook.io/~/files/v0/b/gitbook-x-prod.appspot.com/o/spaces%2FII7k0ydU1L24zSe4KxuO%2Fuploads%2FaJ27h3Hy1UdeuvRg4mUu%2FZoho%20select%20region.png?alt=media&amp;token=79f16392-f8c2-4ace-84ad-bac5b6b0aa9f" alt=""><figcaption><p>Select your Zoho mail region</p></figcaption></figure>

This will open an OAuth window, click accept to complete

<figure><img src="https://1158745445-files.gitbook.io/~/files/v0/b/gitbook-x-prod.appspot.com/o/spaces%2FII7k0ydU1L24zSe4KxuO%2Fuploads%2FsHsfLEtu92hhZf2Mwf7K%2FComplete%20Zoho%20OAuth.png?alt=media&amp;token=698374ac-23dd-4c63-a0d1-ea5bc19d096d" alt=""><figcaption><p>Click on the accept to complete the Zoho OAuth integration with DitLead</p></figcaption></figure>

Then click Accept, that's all!

You can warmup the connected Zoho mailbox and also use them in email outreach automation.&#x20;


# Connect AWS SES

How to connect AWS SES to DitLead for email warmup and email outreach campaign automation

There are two steps involved in the integration of AWS SES for sending emails.

* Configure your domain correctly on AWS.
* Get SMTP details.
* Add your details to Murlist.com

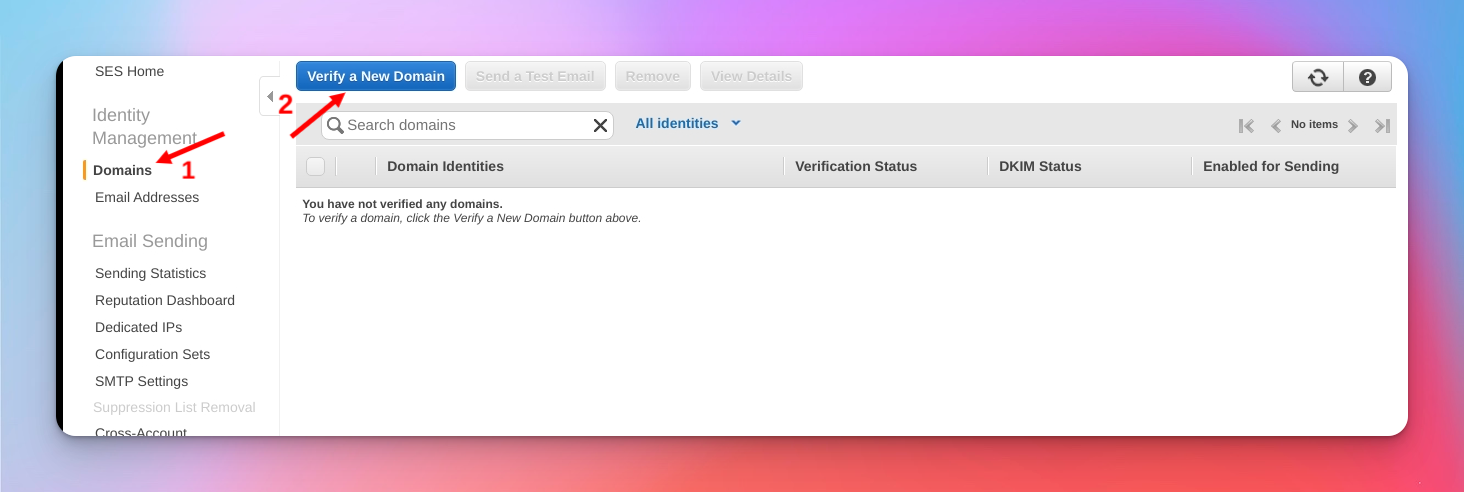
#### Configure your domain on AWS. <a href="#configure-your-domain-on-aws" id="configure-your-domain-on-aws"></a>

For most users, this step is usually completed already. Amazon has a help article on how to add your domain here: <https://docs.aws.amazon.com/ses/latest/DeveloperGuide/send-email-set-up.html>

<figure><img src="https://1158745445-files.gitbook.io/~/files/v0/b/gitbook-x-prod.appspot.com/o/spaces%2FII7k0ydU1L24zSe4KxuO%2Fuploads%2FosdvvGdi8cJTfKphcKbL%2FAdd%20AWS%20SES%20domain.png?alt=media&amp;token=90098d4f-dec9-4e51-bb63-e82c2578c76b" alt=""><figcaption><p>Add and verify a domain on AWS SES</p></figcaption></figure>

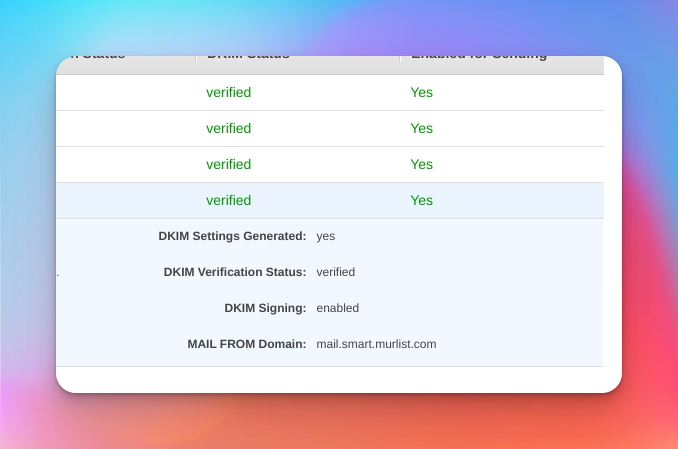
Next, ensure all DKIM and mail from are well configured. This is very important as it can make or break your campaign efforts.

<figure><img src="https://1158745445-files.gitbook.io/~/files/v0/b/gitbook-x-prod.appspot.com/o/spaces%2FII7k0ydU1L24zSe4KxuO%2Fuploads%2FQNyQkJWUBzdmLNImMky5%2Fconfigure%20AWS%20SES%20DNS%20settings.png?alt=media&amp;token=f59671ef-b4f0-44d6-a5cc-49ec43bd3723" alt=""><figcaption><p>Configure the AWS SES domain's DNS for sending emails</p></figcaption></figure>

#### GET AWS SES SMTP details <a href="#get-aws-ses-smtp-details" id="get-aws-ses-smtp-details"></a>

Ensure you are in the same region and click on "SMTP setting". Copy SMTP details as in the picture (label 2). Then create an SMTP credentials by clicking the "create My SMTP Credentials" as in the picture below.

<figure><img src="https://1158745445-files.gitbook.io/~/files/v0/b/gitbook-x-prod.appspot.com/o/spaces%2FII7k0ydU1L24zSe4KxuO%2Fuploads%2Fec7AQjQda04lmnOvlLHO%2FCreate%20AWS%20SMTP%20credentials.png?alt=media&amp;token=52965136-7849-4f7b-9c7c-8905ae26b053" alt=""><figcaption><p>Create SMTP credentials to use in connecting AWS SES to DitLead</p></figcaption></figure>

The likes of AWS SES, SendGrid, SendinBlue do not provide IMAP. So you will need the IMAP of another mail provider like Google, Zoho, AWS Workmail, etc. A general rule is to use the IMAP of where you receive replies to your emails but we place no restrictions on this. You can use whatever IMAP you prefer.


# Connect SendGrid

How to connect SendGrid to DitLead for email warmup and email outreach campaign automation

SendGrid has a pretty straightforward and standard SMTP configuration.

|                    |                   |
| ------------------ | ----------------- |
| **Ports**          | 587               |
| **Username**       | apikey            |
| **Password**       | YOUR\_API\_KEY    |
| **Server \| Host** | smtp.sendgrid.com |

Yes, you have to enter the keyword "apikey" literally as the username. But you will need to create an API Key to use as the password.

Here is how to create an API key to use as the password for SendGrid:

Go to <https://app.sendgrid.com/guide/integrate/langs/smtp>

<figure><img src="https://1158745445-files.gitbook.io/~/files/v0/b/gitbook-x-prod.appspot.com/o/spaces%2FII7k0ydU1L24zSe4KxuO%2Fuploads%2F3lvOcnLaJdaCulgWYaUJ%2FSendgrid%20setup.png?alt=media&amp;token=6e438888-1e92-412b-bcaa-928aa33a71f5" alt=""><figcaption><p>Create API key for SendGrid to connect to DitLead</p></figcaption></figure>

Enter a name for your API key, this could be anything. It is just for your own identification then click "Create key". An API key will be generated.

Once you have the API key, enter it as the password for your SendGrid SMTP setup at https:murlist.com/dashboard. You are all set!

The likes of AWS SES, SendGrid, SendinBlue do not provide IMAP. So you will need the IMAP of another mail provider like Google, Zoho, AWS Workmail, etc. A general rule is to use the IMAP of where you receive replies to your emails but we place no restrictions on this. You can use whatever IMAP you prefer.


# Connect MailGun

How to connect MailGun to DitLead for email warmup and email outreach campaign automation

Configuring Mailgun for warmup can be a little tricky considering it, like AWS SES, doesn't have an inbound IMAP.

We permit using SMTP from one provider and an IMAP from another. So you can use SMTP from Mailgun and IMAP from any other service you like.

**Outgoing Mail (SMTP) Server**

* Server - smtp.mailgun.org (US) | smtp.eu.mailgun.org (EU)
* Port - *465* or *587*
* User - Your email
* Password - *Your API Key*

The likes of AWS SES, SendGrid, SendinBlue, Mailgun do not provide IMAP. So you will need the IMAP of another mail provider like Google, Zoho, AWS Workmail, etc. A general rule is to use the IMAP of where you receive replies to your emails but we place no restrictions on this. You can use whatever IMAP you prefer.


# Connect Yahoo Mail

Configuring Yahoo mail for email warming requires only 2 steps.

Here are the configuration details for Yahoo Mail email warmup.

**Incoming Mail (IMAP) Server**

* Server - *imap.mail.yahoo.com*
* Port - *993*
* Requires SSL - *Yes*

**Outgoing Mail (SMTP) Server**

* Server - *smtp.mail.yahoo.com*
* Port - *465* or *587*
* Requires SSL - *Yes*
* Requires authentication - *Yes*

**Your login info**

* Email address - Your full email address (<name@domain.com>)
* Password - **Generate App Password**
* Requires authentication - *Yes*

Notice the password says "Generate App Password". This is means that you have to create a unique password to authenticate Murlist. This is pretty easy to do and involves just a few steps.

1.
2. Click **Generate app password** or **Generate and manage app passwords**.
3. Enter your app's name in the text field.
4. Click **Generate password**.
5. Follow the instructions below the app password.
6. Click **Done**.

[PreviousConfigure MailGun](broken://pages/hMqTzaiiRG6vgzf9MBK4)NextHow to create inbox filter

Last updated 3 years ago


# How to create inbox filter

Create inbox filter for email

Now that you have added your mailbox for warmup. It is important to create a filter to keep your inbox clean. This way you don't get to see emails from our network that might disrupt your workflow.

{% hint style="info" %}
The keyword to use in filtering is "**clx**".
{% endhint %}

For Google mail, follow the guide below:

{% embed url="<https://youtu.be/Q8jGcTtk1_g>" %}

Complete the following actions:

1. Select the configure icon on the search bar.
2. Enter the word "**clx**" in the subject field and click on the create filter button.
3. Mark the options **Skip the inbox**, **Mark as read**, **Never send to Spam**, **Always mark as important**, then choose **primary** in 'Categories as' field.


# Email warmup Setup & Configuration

This guide goes into details on how to setup and configure email warming on DitLead

Before you start, make sure you have [connect your email mailbox to DitLead](/setups-and-configurations/how-to-connect-email-accounts-to-ditlead).&#x20;

<figure><img src="https://1158745445-files.gitbook.io/~/files/v0/b/gitbook-x-prod.appspot.com/o/spaces%2FII7k0ydU1L24zSe4KxuO%2Fuploads%2FDRs007L8QIoj2a9CWmgP%2FTurn%20on%20warmin.png?alt=media&amp;token=744f914d-6e70-4eac-9f65-4c414c698bf5" alt=""><figcaption><p>Toggle on the switch to enable email warmin</p></figcaption></figure>

Toggle on the switch as in the picture above to enable email warming, that all!

#### Click option, then insight to see warming analytics.

<figure><img src="https://1158745445-files.gitbook.io/~/files/v0/b/gitbook-x-prod.appspot.com/o/spaces%2FII7k0ydU1L24zSe4KxuO%2Fuploads%2FXlPSDMo4o3vZM0s5Evci%2Fimage.png?alt=media&amp;token=61bb12d8-c51e-4d4a-aa6b-cbe6eea9fec5" alt=""><figcaption></figcaption></figure>


# Common errors


# Custom Reply-To

**Reply-To Email: Overview and Configuration Guide**

### 1. What the Reply-To setting does

The Reply-To setting controls which email address receives replies from recipients.

Without a custom setting:

* Replies go to the mailbox sender address by default.

With custom Reply-To enabled:

* Outgoing emails include a `Reply-To` header using your configured custom address.
* Recipients who click “Reply” will reply to that custom address instead of the sender address in the `From` header.

### 2. Why this setting exists

A custom reply-to address is useful when you’re sending emails through SMTP-only providers such as AWS SES, Mailgun, or SendGrid, which are typically designed for outbound messaging and don’t handle incoming replies. By setting a reply-to address, you can direct all recipient responses to a separate inbox that you control, ensuring you actually receive and manage replies instead of losing them. This is especially important if you’re using a mailbox that supports both SMTP and IMAP, as our system relies on IMAP to sync incoming messages. Configuring a compatible reply-to address allows features like the unified inbox to function properly, giving you full visibility and control over email conversations.

This is useful when you want:

* A different inbox to receive responses.
* A centralized reply mailbox for one or many sender accounts.
* Better operational routing of responses without changing the visible sender identity.

### 3. Provider support

Custom Reply-To is supported for mailboxes connected though the custom SMTP option, OAuth connections like Zoho and Microsoft aren't supported.

Not supported:

* Google mailboxes
* Microsoft mailboxes
* Zoho mailboxes

For unsupported providers, the system continues using the sender email behavior.

### 4. Default behavior

Default state:

* Custom Reply-To is OFF.
* Reply behavior uses the sender email address.

No action is required unless you want replies routed elsewhere.

### 5. Critical requirement for Unibox sync

If you enable custom Reply-To on SMTP:

* The custom Reply-To address should be the same mailbox monitored by IMAP for that sender.

If they do not match:

* Replies may still be delivered to that custom address.
* Unibox may not ingest/sync those replies correctly.

### 6. How to configure (single mailbox)

1. Open the mailbox settings for an SMTP mailbox.
2. Go to General Settings.
3. Find the Reply-To section.
4. Enable “Use custom reply-to email”.
5. Enter the custom reply-to email address.
6. Save changes.

Validation enforced:

* The field cannot be empty when enabled.
* The value must be a valid email format.
* It must match the IMAP mailbox requirement used for reply ingestion.

### 7. How to configure (bulk update)

Bulk General Settings supports custom Reply-To for SMTP selections.

<figure><img src="https://1158745445-files.gitbook.io/~/files/v0/b/gitbook-x-prod.appspot.com/o/spaces%2FII7k0ydU1L24zSe4KxuO%2Fuploads%2FwjKEXxaqDdDKmgV40Q5S%2Fimage.png?alt=media&amp;token=2cc2278a-4c24-4b37-bd8a-a34a94facc98" alt=""><figcaption></figcaption></figure>

Behavior:

* Available only when all selected accounts are SMTP.
* If your selection includes non-SMTP accounts, bulk Reply-To update is unavailable.
* If you do not edit the Reply-To section, existing Reply-To values are left unchanged.

Bulk steps:

1. Select SMTP mailboxes.
2. Open Bulk General Settings.
3. Enable custom reply-to (optional).
4. Enter one custom reply-to email for all selected accounts.
5. Save bulk changes.

### 8. Sending behavior after configuration

For SMTP sends:

* If custom Reply-To is enabled and non-empty, outgoing email uses that address as `Reply-To`.
* Otherwise, it falls back to sender email.

This applies to:

* Campaign sends
* Single/manual SMTP sends
* SMTP test-send flows

### 9. Recommended best practices

* Use an actively monitored inbox as Reply-To.
* Keep Reply-To aligned with the IMAP mailbox used by your inbox sync pipeline.
* Test by sending to a personal inbox and clicking Reply.
* Confirm replies appear in Unibox before rolling out broadly.
* For teams, define a policy for when to use sender email vs shared reply mailbox.

### 10. Troubleshooting

Replies are not appearing in Unibox:

* Verify custom Reply-To matches the IMAP mailbox configured for that sender.
* Verify IMAP credentials and folder mapping are healthy.
* Confirm the mailbox is SMTP (feature is SMTP-only).

Cannot enable bulk Reply-To:

* Check selected accounts. All must be SMTP.

Validation error while saving:

* Ensure the Reply-To is a valid email address.
* Ensure it is not empty when custom Reply-To is enabled.

### 11. Quick FAQ

Does custom Reply-To change the From address?

* No. It only changes where recipient replies are routed.

If custom Reply-To is disabled, what happens?

* Reply behavior uses sender email as before.

Can I use this on Microsoft/Google/Zoho mailboxes?

* No. currently only custom SMTP connections support this.

***


# How to import leads to DitLead

Importing leads into DitLead is a crucial step in launching successful outreach campaigns. DitLead provides multiple flexible options to upload leads.

<figure><img src="https://1158745445-files.gitbook.io/~/files/v0/b/gitbook-x-prod.appspot.com/o/spaces%2FII7k0ydU1L24zSe4KxuO%2Fuploads%2Fv75oF7wNiOVpcXYOEEPM%2Fcontact%20manager.png?alt=media&amp;token=33f0f71d-5bf9-4018-8b87-ae4a899bebb5" alt=""><figcaption><p>How to add and manage leads in DitLead</p></figcaption></figure>

### Lead import options:

There are currently 3 options to import leads into DitLead for email and Linkedin outreach automation.

1. [Upload](#id-1.-upload)
2. [Email entry](#id-2.-email-input)
3. [Manual entry using web form.](#id-3.-manual-entry)

<figure><img src="https://1158745445-files.gitbook.io/~/files/v0/b/gitbook-x-prod.appspot.com/o/spaces%2FII7k0ydU1L24zSe4KxuO%2Fuploads%2FYcB0q0iVk56yfixXSpaF%2Fcontact%20upload%20options.png?alt=media&amp;token=60aba378-7231-484e-bfd9-66558f481ace" alt=""><figcaption><p>Use upload, manual import and email pasting to import leads into DitLead</p></figcaption></figure>

#### 1. **Upload**

You can import leads in bulk by uploading a file. Supported file formats include:

* **CSV**
* **XLSX**
* **XLS**

**Steps to upload leads:**

1. Click the **Upload Leads** button.
2. Select and upload your file.
3. Map the fields in your file to DitLead’s lead fields (e.g., name, email, company).
4. Review and confirm the import.

<figure><img src="https://1158745445-files.gitbook.io/~/files/v0/b/gitbook-x-prod.appspot.com/o/spaces%2FII7k0ydU1L24zSe4KxuO%2Fuploads%2FbD19J7Bzn8ieOn2zp6uF%2FLead%20import%20form.png?alt=media&amp;token=89e7283d-b2c8-45e5-8215-2a771daa2678" alt=""><figcaption><p>Import contact into DitLead by upload a CSV, XLSX or an XLS file</p></figcaption></figure>

***

#### 2. **Email Input**

For a quick import, you can paste a list of email addresses directly.

**Steps to use Email Input:**

1. Click **Import via Email Input**.
2. Paste your list of emails, separated by commas or line breaks.
3. Map additional fields if needed and confirm.

<figure><img src="https://1158745445-files.gitbook.io/~/files/v0/b/gitbook-x-prod.appspot.com/o/spaces%2FII7k0ydU1L24zSe4KxuO%2Fuploads%2F4JIrXdUjOmaEII6mXSZ3%2Fimport%20by%20pasting%20emails.png?alt=media&amp;token=3a4e5cc2-d7fe-4418-8cec-ebe0babf030e" alt=""><figcaption><p>Import contact into DitLed by pasting a list of emails</p></figcaption></figure>

***

#### 3. **Manual Entry**

If you need to add leads one by one, use the **Manual Entry** option with DitLead’s lead form. This option is perfect if you need to provide more than name and email for the contact. You can enter the contact ID, location etc.

**Steps for manual entry:**

1. Click **Add Lead Manually**.
2. Fill out the lead form, including details like name, email, company, and any custom fields.
3. Save the lead to add it to your campaign.

<figure><img src="https://1158745445-files.gitbook.io/~/files/v0/b/gitbook-x-prod.appspot.com/o/spaces%2FII7k0ydU1L24zSe4KxuO%2Fuploads%2FrEvnvT2O8Dc4ywDjxeNk%2Fcreate%20with%20manual%20web%20form.png?alt=media&amp;token=0143dc2b-bebc-4ce3-a97b-ec0e4e293db6" alt=""><figcaption></figcaption></figure>

### Managing Imported Leads

Once leads are imported, you can:

* **Filter and Sort**: Organize your leads based on criteria such as name, email status, or tags.
* **Email Validation**: Use DitLead’s built-in email validation tool to ensure your leads have valid and deliverable email addresses.
* **Lead Assignment**: Assign leads to specific team members for follow-ups or personalized outreach.

***

### Best Practices for Lead Importing

* **Clean Your Data**: Before importing, ensure your files are free from duplicates and have accurate contact details.
* **Map Fields Correctly**: Properly mapping fields ensures all lead information is correctly stored in DitLead.
* **Validate Emails**: Always run email validation to improve deliverability and avoid bounces.

***

By following these steps, you can seamlessly import leads into DitLead and prepare for successful outreach campaigns. Once your leads are uploaded, head to the **Automation** section to start creating personalized workflows and messaging. Happy prospecting! 🚀


# Custom fields & label

Customizing your contact data is essential for effective and personalized email & Linkedin outreach. DitLead offers Custom Fields and Custom Labels to help you organize and manage your leads.

## Custom Fields and Custom Labels in DitLead

Customizing your contact data is essential for effective and personalized outreach. DitLead offers **Custom Fields** and **Custom Labels** to help you organize and manage your leads with precision. This guide will explain how to create and use these features.

<figure><img src="https://1158745445-files.gitbook.io/~/files/v0/b/gitbook-x-prod.appspot.com/o/spaces%2FII7k0ydU1L24zSe4KxuO%2Fuploads%2Fta7LmOMIQ8JV9sQLkYZl%2Fcontact%20management%20on%20DitLead.png?alt=media&amp;token=2fe1abbc-bf55-451e-b1de-d3a60b6cd20d" alt=""><figcaption><p>Manage imported Leads on DitLead</p></figcaption></figure>

***

### Custom Fields

#### What are Custom Fields?

**Custom Fields** allow you to add additional information to your contacts beyond standard fields like name and email. This flexibility helps you store specific details that can enhance personalization in your campaigns.

#### Examples of Custom Fields:

* **Job Title**
* **Company Size**
* **Industry**
* **Purchase History**
* **Customer Notes**

#### How to Create Custom Fields:

1. Navigate to the **Leads & Contact** section in settings.
2. Click on **Custom Fields** in the settings menu.
3. Choose **Add Custom Field** and enter:
   * **Field Name**: A descriptive name for the field (e.g., "Preferred Contact Time").
   * **Field Type**: Select from text, number, date, dropdown, or checkbox, depending on the data format.
4. Save the custom field.

<figure><img src="https://1158745445-files.gitbook.io/~/files/v0/b/gitbook-x-prod.appspot.com/o/spaces%2FII7k0ydU1L24zSe4KxuO%2Fuploads%2FiwjjqstRfuqoqDOMLeNT%2Fadd%20custom%20fields.png?alt=media&amp;token=8f9097a0-432b-45ca-8eca-bd1e334e5ecf" alt=""><figcaption><p>Add custom fields to use in personalization etc</p></figcaption></figure>

#### Using Custom Fields in Campaigns:

* **Personalization**: Use custom fields in email and LinkedIn messages for highly targeted outreach. For example, insert a custom field like `{{job_title}}` to personalize emails.
* **Segmentation**: Filter leads based on custom fields to create more relevant segments for your campaigns.

***

### Custom Labels

#### What are Custom Labels?

**Custom Labels** are tags you can apply to contacts to categorize and organize them. Labels make it easy to group contacts based on shared characteristics or campaign goals.

#### Examples of Custom Labels:

* **Hot Lead**
* **Cold Lead**
* **Enterprise Client**
* **Webinar Attendee**
* **High Priority**

#### How to Create and Apply Custom Labels:

1. In the **Leads** section, select the contacts you want to label.
2. Click **Add Label** and choose an existing label or create a new one.
3. Assign the label to the selected contacts.

#### Using Custom Labels:

* **Filtering and Sorting**: Quickly filter contacts by labels to focus on specific groups.
* **Automation**: In the **Automation** section, use labels to trigger conditional actions. For example, you can create a workflow that routes **Hot Leads** to a sales rep automatically.

<figure><img src="https://1158745445-files.gitbook.io/~/files/v0/b/gitbook-x-prod.appspot.com/o/spaces%2FII7k0ydU1L24zSe4KxuO%2Fuploads%2Fbj6OjAom4fPASqk3dqKC%2Fadd%20label.png?alt=media&amp;token=e925b76e-c524-496b-9b50-8956f81c87bd" alt=""><figcaption></figcaption></figure>

***

### Best Practices for Custom Fields and Labels

* **Keep It Simple**: Use clear, concise names for fields and labels to ensure team-wide understanding.
* **Stay Organized**: Regularly review and update your fields and labels to keep your database clean.
* **Leverage for Personalization**: Combine custom fields and labels with DitLead’s AI copywriting to craft hyper-personalized outreach content.

By effectively using Custom Fields and Labels, you can enhance your lead management, improve segmentation, and drive more personalized campaigns with DitLead. 🎯


# Managing pipelines

Manage deal pipeline using a simple, intuitive drag-and-drop CRM pipeline

### 1. Manage pipeline

<figure><img src="https://1158745445-files.gitbook.io/~/files/v0/b/gitbook-x-prod.appspot.com/o/spaces%2FII7k0ydU1L24zSe4KxuO%2Fuploads%2F7GktKyStDZ8uv171xfNb%2Fpipeline%20management.png?alt=media&amp;token=862fd4e8-1e5a-42bc-a895-c50c7bd195f2" alt=""><figcaption></figcaption></figure>

## Managing Deal Pipelines in DitLead

DitLead’s **Deal Pipeline** feature helps you track, manage, and move leads through various stages of your sales process. It offers a visual, intuitive way to monitor progress and prioritize actions, ensuring no deal slips through the cracks. This guide will walk you through how to set up and manage your deal pipeline effectively.

***

### What is a Deal Pipeline?

A **Deal Pipeline** represents the stages a lead goes through, from initial contact to closing a deal. Each stage helps you track progress, identify bottlenecks, and optimize your sales efforts.

#### Example Stages in a Deal Pipeline:

* **New Lead**
* **Contacted**
* **Qualified**
* **Proposal Sent**
* **Negotiation**
* **Closed – Won**
* **Closed – Lost**

***

### DitLead's Deal AI

Deal AI is an AI feature that automatically monitors your email and Linkedin outreach campaign to discover potential deals and opportunities based on leads interaction.&#x20;

<figure><img src="https://1158745445-files.gitbook.io/~/files/v0/b/gitbook-x-prod.appspot.com/o/spaces%2FII7k0ydU1L24zSe4KxuO%2Fuploads%2FowaRZErlxzNHxaNFkPIu%2Fdeal%20AI%20demo.png?alt=media&amp;token=8cac8a45-bdcf-482e-8e46-7131257766d5" alt=""><figcaption><p>Configure Deal AI to have to automatically track opportunities</p></figcaption></figure>

### How to Set Up a Deal Pipeline

#### Step 1: Accessing the Pipeline

1. Navigate to the **CRM** tab and select **Deal Pipelines**.
2. Click **Create Pipeline** to start building your custom pipeline. You can create multiple pipelines.

#### Step 2: Adding Stages

1. Add stages by clicking **Add Stage**.
2. Name each stage based on your sales process (e.g., "Contacted," "Proposal Sent").
3. Optionally, set **stage-specific tasks** or criteria to move leads automatically.

#### Step 3: Customizing Stages

You can:

* **Reorder Stages**: Drag and drop stages to arrange them in the correct sequence.
* **Add Stage Limits**: Set the maximum time a lead should spend in each stage to avoid stagnation.
* **Assign Tasks**: Automatically assign tasks to team members at specific stages.

***

### Managing Leads in the Pipeline

#### Moving Leads Through Stages

1. Go to the **Leads** section or the pipeline view.
2. Drag and drop leads into the appropriate stage.
3. Leads can also be automatically moved based on conditions set in the **Automation** section (e.g., when a lead replies to an email).
4. When configured, DitLead's Deal AI can automatically create new deals when it detects potential deals in your email & linkedin outreach campaign

#### Tracking Progress

* Use the **Pipeline View** to get a visual overview of all active deals.
* Click on a lead to view detailed information, notes, and previous interactions.

***

### Automation and Deal Pipelines

Leverage **Automation** to streamline your pipeline management:

* **Conditional Routing**: Automatically move leads to a new stage based on engagement (e.g., when a lead opens a proposal).
* **Task Creation**: Set up tasks for sales reps when a lead enters a specific stage.
* **Notifications**: Enable alerts to notify team members when high-priority leads reach critical stages.

***

### Pipeline Reporting and Insights

DitLead’s **Analytics** section provides insights into pipeline performance:

* **Deal Value Tracking**: See potential revenue at each stage.
* **Conversion Rates**: Monitor how effectively leads move from one stage to the next.
* **Bottleneck Identification**: Identify stages where leads are getting stuck and take corrective action.

***

### Best Practices for Managing Deal Pipelines

* **Define Clear Stages**: Ensure each stage has clear entry and exit criteria.
* **Update Regularly**: Keep your pipeline up to date by reviewing and moving leads frequently.
* **Use Automation**: Automate repetitive tasks to focus on high-value activities.
* **Monitor Metrics**: Use analytics to optimize and refine your pipeline strategy.

By effectively managing your deal pipeline in DitLead, you can streamline your sales process, boost productivity, and close more deals efficiently. 🎯


# Deliverability in DitLead

DitLead offers powerful tools and configurations like custom tracking domain and custom proxy to help improve your deliverability, ensuring your emails land in your recipients' inboxes.

### Why Deliverability Matters

Deliverability refers to the ability of your emails to reach the intended recipients’ inboxes. Factors that affect deliverability include:

* **Sender Reputation**
* **Email Content**
* **Domain Configuration**
* **IP Address Health**

Improving deliverability increases open rates, engagement, and ultimately, conversions.

***

### Key Deliverability Features in DitLead

#### 1. **Custom Tracking Domain**

A **Custom Tracking Domain** allows you to use your own branded domain for tracking links and opens in emails. This reduces the likelihood of spam filters flagging your emails and enhances credibility.

**Benefits:**

* **Improved Sender Reputation**: Using your own domain increases trust and reduces spam triggers.
* **Brand Consistency**: Emails appear more professional with a branded tracking URL.
* **Spam Filter Avoidance**: Generic tracking links can raise red flags; a custom domain mitigates this.

**How to Set Up a Custom Tracking Domain:**

Follow the guide to [setup custom tracking domain on DitLead](/deliverability/custom-domain).

***

#### 2. **Custom Proxy**

A **Custom Proxy** routes your email traffic through a dedicated IP or proxy, isolating your activities from other users. This setup further protects your sender reputation and enhances deliverability.

**Benefits:**

* **Activity Isolation**: Keeps your email sending activities separate from others, minimizing the risk of being affected by shared IP issues.
* **Increased Control**: You have more control over the IPs used, allowing for better monitoring and management.
* **Enhanced Privacy**: A custom proxy provides an additional layer of security and privacy.

**How to Set Up a Custom Proxy:**

Follow the guide to [setup custom proxy on DitLead](/deliverability/custom-proxy).

***

### Additional Tips for Improving Deliverability

* **Email Warmup**: Use DitLead’s **Email Warmup** feature to gradually build a positive sender reputation before large campaigns.
* **Email Validation**: Validate your leads' email addresses to reduce bounces.
* **Content Optimization**: Avoid spammy language and ensure your emails are well-structured and personalized.
* **Unsubscribe Link**: Include an unsubscribe link to comply with email regulations and maintain trust.
* **Spintax**: Use spintax to randomise the email content received by each contact while keeping the email structure and message. This help disassociate each emails from others and improve deliverability&#x20;

***

By configuring a **Custom Tracking Domain** and **Custom Proxy** in DitLead, you can significantly boost your email deliverability, protect your sender reputation, and improve campaign success. Combine these features with best practices like email warmup and validation to maximize your outreach results. 🚀


# Custom domain

Enhance email deliverability by using a unique custom tracking domain for each of your mailbox.

A **Custom Tracking Domain** is a powerful feature in DitLead that enhances your email deliverability by replacing generic tracking URLs with your own branded domain. This customization not only improves your sender reputation but also boosts trust and engagement with recipients.

***

### What is a Custom Tracking Domain?

A **Custom Tracking Domain** is a personalized domain used for tracking email opens, clicks, and other engagement metrics. Instead of using a shared domain for tracking, DitLead allows you to configure your own, ensuring a seamless and professional experience for recipients.

***

### Why Use a Custom Tracking Domain?

#### 1. **Improved Email Deliverability**

Spam filters are more likely to flag emails with generic or shared tracking links. A custom domain increases the chances of your emails landing in the inbox by reducing spam triggers.

#### 2. **Enhanced Brand Trust**

Recipients are more likely to trust links that match your brand. A custom tracking domain creates a consistent brand experience and fosters trust.

#### 3. **Boosted Sender Reputation**

Using a custom domain isolates your email activity from other users, helping to build and maintain a strong sender reputation.

#### 4. **Analytics and Insights**

You can track detailed engagement metrics without compromising deliverability, gaining valuable insights into your email outreach campaign performance.

***

### How to Set Up a Custom Tracking Domain

Follow these steps to configure your custom tracking domain in DitLead:

#### Step 1: Access the Tracking Domain Settings

1. Go to **Email account section** in DitLead.
2. Click on options, and select **Deliverability**, then the **Custom Tracking Domain** section.

<figure><img src="https://1158745445-files.gitbook.io/~/files/v0/b/gitbook-x-prod.appspot.com/o/spaces%2FII7k0ydU1L24zSe4KxuO%2Fuploads%2FINz3aKfzbUEVz4lpqmR2%2FDeliverability%20settings.png?alt=media&amp;token=1405af90-d594-4bcf-99e7-16e9da14b95d" alt=""><figcaption><p>Go to deliverability settings</p></figcaption></figure>

#### Step 2: Add a New Domain

1. Click **Add Tracking Domain**.
2. Enter the domain or subdomain you want to use (e.g., `track.yourdomain.com`).

<figure><img src="https://1158745445-files.gitbook.io/~/files/v0/b/gitbook-x-prod.appspot.com/o/spaces%2FII7k0ydU1L24zSe4KxuO%2Fuploads%2FJQOQ5NDqt1XdagLmzMqU%2Fconfigure%20custom%20proxy.png?alt=media&amp;token=f6604403-b7e5-49d6-86f0-7a20d53a5db8" alt=""><figcaption><p>Configure custom domain for tracking</p></figcaption></figure>

#### Step 3: Configure DNS Records

1. Log in to your domain registrar (e.g., GoDaddy, Namecheap).
2. Add a **CNAME record** with the following details:
   * **Host**: The subdomain you want to use (e.g., `track`).
   * **Points to**: The tracking domain provided by DitLead.
3. Save the changes and allow some time for DNS propagation.

#### Step 4: Verify the Domain

1. Return to DitLead and click **Verify** next to the domain you added.
2. Once verified, your custom tracking domain will be active.

***

### Best Practices for Custom Tracking Domains

* **Use a Subdomain**: It’s recommended to use a subdomain (e.g., `track.yourdomain.com`) instead of your root domain. Ideally, use the same subdomain as the mailbox.
* **Monitor DNS Health**: Regularly check your DNS records to ensure everything is configured correctly.
* **Stay Consistent**: Use the same tracking domain across all campaigns for consistency.

***

### Troubleshooting Tips

* **DNS Propagation Delay**: DNS changes can take up to 48 hours to propagate. If verification fails initially, wait a few hours and try again.
* **Incorrect CNAME Setup**: Double-check your DNS settings to ensure the CNAME record points to the correct address provided by DitLead.
* **Domain Verification Issues**: If verification issues persist, contact your domain provider or DitLead support for assistance.

***

By setting up a **Custom Tracking Domain** in DitLead, you can unlock higher deliverability rates, build trust with your audience, and optimize campaign performance. Take control of your email tracking today and watch your outreach efforts soar! 🚀


# Custom proxy

The Custom Proxy feature in DitLead allows you to route your email traffic through a dedicated proxy server, isolating your sending activity and improving email deliverability.

By using a **SOCKS5 proxy with mailing access**, you can add an extra layer of isolation, privacy, control, and reputation management to your outreach campaigns. These ultimately improves deliverability.

***

### What is a Custom Proxy?

A **Custom Proxy** acts as an intermediary between DitLead and the recipient's email servers, masking your IP address and isolating your email activities from other users. This can significantly boost your sender reputation and help avoid spam filters.

#### Why Use a Custom Proxy?

* **Activity Isolation**: Keeps your email traffic separate from other users, minimizing the risk of shared IP issues.
* **Improved Deliverability**: By isolating your email traffic, you maintain a clean sending reputation.
* **Enhanced Privacy**: A custom proxy adds a layer of security by masking your IP address.
* **Increased Control**: You have more control over the IP and routing, allowing for better monitoring and management.

***

### Requirements for Custom Proxy

* **Proxy Type**: The proxy must be a **SOCKS5 proxy**.
* **Mailing Access**: The proxy should allow email traffic to ensure smooth campaign delivery.
* **Stable Connection**: Use a reliable and fast proxy to avoid delays and disconnections during email sending.

***

### How to Set Up a Custom Proxy

#### Step 1: Access Proxy Settings

1. Navigate to **Settings** in DitLead.
2. Click on options, and select **Deliverability**, then the **Custom Proxy** section.

<figure><img src="https://1158745445-files.gitbook.io/~/files/v0/b/gitbook-x-prod.appspot.com/o/spaces%2FII7k0ydU1L24zSe4KxuO%2Fuploads%2FINz3aKfzbUEVz4lpqmR2%2FDeliverability%20settings.png?alt=media&amp;token=1405af90-d594-4bcf-99e7-16e9da14b95d" alt=""><figcaption><p>Configure deliverability on. DitLead</p></figcaption></figure>

#### Step 2: Configure the Proxy

1. Click **Add Custom Proxy**.
2. Enter the following details:
   * **Proxy Type**: Select **SOCKS5**.
   * **IP Address**: Enter the IP address of your proxy server.
   * **Port**: Specify the port number for the proxy connection.
   * **Authentication**: If your proxy requires authentication, enter the username and password.

<figure><img src="https://1158745445-files.gitbook.io/~/files/v0/b/gitbook-x-prod.appspot.com/o/spaces%2FII7k0ydU1L24zSe4KxuO%2Fuploads%2FNzydUacLj1lrAsbW08xX%2Fcustom%20proxy.png?alt=media&amp;token=581185ed-fe52-4e1b-a2aa-48daf72610cb" alt=""><figcaption><p>Configure Socks5 proxy to isolate your emails and improve deliverability</p></figcaption></figure>

#### Step 3: Test and Save

1. Click **Test Connection** to ensure the proxy is configured correctly.
2. Once the test is successful, click **Save** to apply the settings.

***

### Best Practices for Custom Proxy Configuration

* **Choose a Reliable Proxy Provider**: Use a reputable proxy service to ensure stability and performance.
* **Monitor Connection Health**: Regularly test the proxy connection to avoid disruptions in email sending.
* **Avoid Public Proxies**: Public proxies can be unreliable and may compromise your deliverability.

***

### Troubleshooting Common Issues

* **Connection Errors**: Ensure the IP, port, and authentication details are correct. Also, verify that the proxy allows email traffic.
* **Slow Performance**: Use a proxy with low latency and high bandwidth to maintain optimal sending speeds.
* **Authentication Failures**: Double-check your username and password or consult your proxy provider for support.

***

By configuring a **Custom SOCKS5 Proxy with mailing access** in DitLead, you can enhance your email deliverability, protect your sender reputation, and maintain greater control over your outreach campaigns. Combine this feature with other deliverability tools like custom tracking domains and email warmup to maximize your success. 🌐📧


# Why Are My DitLead Campaigns Not Sending Emails Fast Enough?

### Understanding Email Queues

If you notice that your DitLead campaigns are sending emails slowly or have a large number of emails waiting in queue, this is typically related to how multiple campaigns share the same sender accounts.

#### What's Happening?

When you run multiple campaigns using the same sender account or group of sender accounts, emails get queued up because:

* Multiple campaigns are scheduling the same sender to send emails
* The queue is affected by the delay between send configuration
* Each sender account can only send one email at a time based on your delay settings

For example, if your sender account has a 5-minute delay between sends and multiple campaigns are using it, emails will pile up in the queue waiting their turn.

### How to Check Your Email Queue

You can monitor your mailbox queues by:

1. Go to **General Settings**
2. Scroll down to view your sender accounts
3. Check the queue numbers next to each sender account

### Solutions to Reduce Email Queues

#### Option 1: Adjust Send Delays (Not Recommended)

You can decrease the wait time between sends for your mailboxes, but **we strongly advise against this** for the following reasons:

* **Deliverability Impact**: Sending emails too frequently can harm your sender reputation
* **Minimum Recommendation**: Never set delays to less than 5 minutes between sends
* **Risk**: Your emails may be marked as spam or blocked by email providers

#### Option 2: Use More Sender Accounts (Recommended)

The best solution is to distribute your campaigns across multiple sender accounts:

**Benefits:**

* Prevents multiple campaigns from competing for the same sender account
* Emails are sent out faster
* Allows for infinite scaling of your campaigns
* Maintains good deliverability practices

**How to Implement:**

1. Set up additional sender accounts
2. Distribute your campaigns across different sender accounts
3. Avoid using the same sender account for multiple active campaigns

### Best Practices

* **Monitor Queue Sizes**: Regularly check your sender account queues in General Settings
* **Plan Campaign Distribution**: Before launching new campaigns, ensure you have enough sender accounts
* **Maintain Send Delays**: Keep at least 5 minutes between sends for optimal deliverability
* **Scale Properly**: Add more sender accounts as you increase your campaign volume

### Need More Help?

If you're still experiencing issues with your email campaigns or need assistance setting up additional sender accounts, please contact our support team with:

* Your campaign details
* Current sender account configuration
* Queue sizes you're experiencing

Following these guidelines will help ensure your DitLead campaigns run smoothly and maintain good email deliverability rates.